X-Deep/32 4.0 X Window System display server for Windows NT/2000 ® and Windows® 95/98/ME operating systems.
xdeep32 [option ...]
X-Deep/32 is full 32 bit, multi-threaded X Window System display server implementation, using Win32® API for Windows NT/2000® and Windows® 9x/ME operating systems. It coexists seamlessly with other applications on the desktop. Besides providing full X11R6.5.1 compliance, it supports various features to enhance the cross platform inter operability between the remote X client application and local Windows NT/2000® and Windows® 9x/ME applications. The latest release of X-Deep/32 X-Server offers improved usability features that enables a user to connect to remote hosts quickly and be up and running in no time.
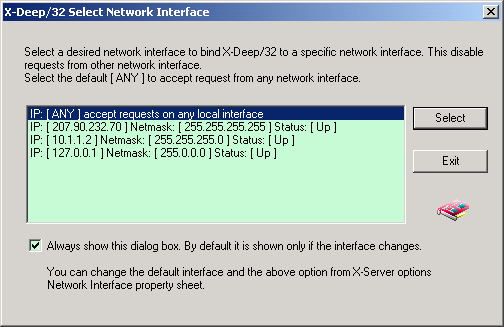
Just double click on the X-Deep/32 icon, in the start menu -> Programs -> folder X-Deep/32 4.0 -> X-Server or the shortcut X-Server created by the install program. On the first startup X-Deep/32 will detect all the network interfaces on your computer, and lets you choose the default interface to which X-Deep/32 should bind to. The default selection is to listen to all the network interface. If you want to bind to specific interface select the interface of your choice. This is useful for systems that have multiple network cards and want X-Deep/32 to listen on a specific network only. After the initial startup, X-Deep/32 will only show the network interface selection dialog if the network interfaces changes. You can choose to show the dialog every time on startup too, by selecting the check box shown below.
X-Deep/32 4.0 has a builtin XDM (X Display Manager) chooser, that can scan the local area network for XDM enabled hosts. This is enabled by default. It shows a dialog box as shown below, that enables you to select a remote UNIX/LINUX host to connect to. You can disable this auto lookup by editing the X-Server options -> XDMCP tab -> disable the local XDM chooser. XDM offers easy connection to remote UNIX/LINUX systems. To enable XDM you will have to setup the remote system to start the xdm or similar program. Your UNIX/LINUX system administrator can help you setup this. If your remote host is running AIX, this feature is enabled by default.
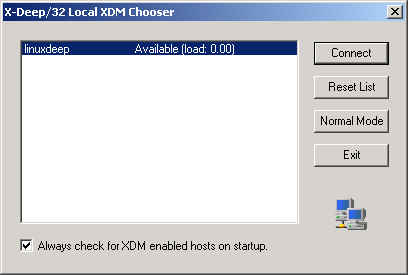
Use the Connect button to connect to the desired host. Use Reset List button to refresh the list of hosts. Use the Normal Mode button to start the X-Server to start in non-XDM mode. You can disable checking for XDM enabled host by unchecking the checkbox at the bottom of the dialog. You can also use the standard XDMCP options of query, indirect and broadcast options that was available in the previous release of X-Deep/32, by selecting the appropriate options in the X-Server options dialog by choosing the XDMCP tab (see X-Server options below).
If you are starting the X-Server in Normal Mode, you can start local clients/demo programs or run remote X application over the TCP/IP network, using one of the following alternative method.
The X-Deep/32 X-Servermay also be started directly from a shell command line, by typing xdeep32 with or without the arguments discussed below. Command line arguments will override the current user defaults. Options can also be changed and are saved in HKEY_CURRENT_USER group of registry database, using the Options Dialog under Edit menu. Please see description on the various options below.
When the X-Server starts up, it displays the logo bitmap, and minimizes itself. Depending upon whether the root window draw option is enabled, it will draw the root window. After it minimizes itself, it is ready to accept connections locally or over the network.
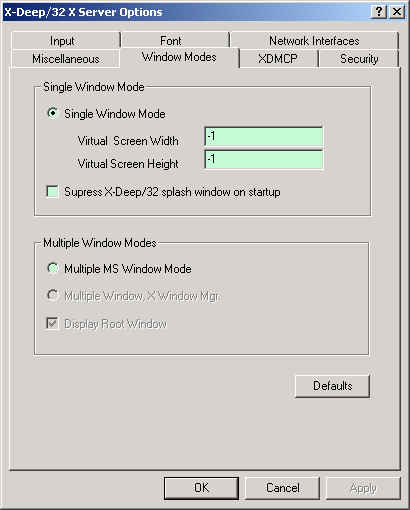
X-Deep/32X-Server supports three window modes : Single Window Mode, Multiple MS Window Modeand Multiple MS Window, X Window Manager Mode. The default window mode is Single Window Mode.You can change the window mode from the X-Server Options dialog box.
- Single Window Mode :This mode requires an X Window manager to manage all the X applications. Twm window manager is supplied with this distribution that can be run locally on your Windows system to manage X Client windows inside the single X root window. You may however choose to run an X Window manager such as motif mwm, kde kwm etc. from a remote system also. If you are connecting to an XDM enabled hosts, the initial startup session starts these window managers automatically.
- Multiple MS Window Mode :In Multiple MS Window Mode each top level X Client window is created as a Microsoft Window and there is a selective option to draw the root window on the windows desktop. In this mode the window management is done locally by the X-Server. Trying to run another X window manager will fail. If you want to run a particular X window manager to suit your X applications, you should chose Single Window Mode. Multiple MS Window Mode however gives you a consistent look and feel of both X Client applications and local Windows applications.
- Multiple MS Window, X Window Manager Mode :This mode is similar to Multiple MS Window Mode, except, you can run a remote X Window Manager like twm, mwm etc. This is useful if you want to run applications in Multiple MS Window Mode, but certain applications are dependent on a specific window manager. In this mode, the root window drawing is disabled, because it can interfere with the Microsoft desktop root window.
- X-Deep/32 X-Server supports running multiple instances. The next instance you start will automatically listens on the next available port after 6000. (Note: The default TCP port that X-Server listens to is 6000) This means if your first instance is running on port 6000 which corresponds to display :0, the next instance will be :1, and then :2 and so on. Using XDM connections, this allows connections to different hosts with different instances thereby providing the independent connections to different remote hosts at the same time.
- The X-Deep/32 X-Server comes with integrated xmodmap functionality that lets you configure the keyboard and the mouse on startup automatically. You can specify an xmodmap format file to the X-Server either using the Options property sheet or from the command line (using –keymap <filename>) to configure your keyboard and the mouse. Following default xmodmap files are supplied for various foreign languages in the directory <xdeep32 dir>\usr\lib\X11\keymaps. You can modify them to suit your requirements and specify the file to the X-Server.
- arabic.map
- belgium.map
- canada.map
- czech.map
- dec.map
- decemfr.map
- decemgr.map
- decemuk.map
- decemus.map
- denmark.map
- dutch.map
- dvorak.map
- english.map
- finland.map
- french.map
- frenchcanada.map
- german.map
- greek.map
- hebrew.map
- hpitfus.map
- iceland.map
- italy.map
- japanese106.map
- korean103.map
- korean106.map
- latinamr.map
- netherland.map
- norway.map
- portugal.map
- russian.map
- spain.map
- sweden.map
- swiss.map
- swissfrench.map
- swissgerman.map
- turkish.map
- uk.map
- uk101.map
- uk102.map
- us.map
- X-Deep/32 X-Server supports font server. You can specify the remote font server in the default font path. It also provides for automatic detection of font servers from XDM enabled hosts in the network. See the OPTIONS section to see how you can use this feature to easily add a font server in your network for use by X-Deep/32 X-Server.
- Various host control mechanism is provided for security. You can enable the host control via the X-Server options Security property tab. The default host control is disabled by default (changed from prior releases). You can enable the access control and control the hosts that connect to your X-Server via Xn.hosts, file or specify the hosts that you would like via the property sheet GUI dialog windows.
- The default color depth for the X-Server depends on the chosen color resolution of your Windows display setting. X-Deep/32 supports depths of 1, 4, 8, 16, 24, 32. For depths greater than 8 bit, X-Deep/32 supports an 8 bit PseudoColor emulation mode. This is useful for certain X application that are written specifically for 8 bit pseudo color. You can choose this option from the X-Server options Miscellaneous property tab.
- X-Deep/32 X-Server also supports cut and paste of text data from X applications and other Windows NT® and Windows® 95 applications by mirroring any data that appears in X-Server’s selection properties and Windows clipboard in CF_TEXT format. The choice of X-Server’s selection property (PRIMARY, SECONDARY, CLIPBOARD, CUT_BUFFER0, CUT_BUFFER1,.. CUT_BUFFER6) can be selected from the options Miscellaneous property sheet. This enables, for example, easy cut and paste of text selections between xterm and any local word processor applications supporting cut and paste. (Please note : xterm uses PRIMARY selection property, CDE applications uses CLIPBOARD selection property).
- Besides cut and paste of text data, X-Deep/32 allows cutting any graphics bitmap data from any X client application to the Windows clipboard, which can be picked up by any local application that supports pasting of bitmap data via CF_BITMAP clipboard format, e.g. paint etc. Use the system menu provided for X-Deep/32 Root Window oreach X client window (in multiple window mode) to select the area that needs to be copied to the clipboard.
- The Print option of system menu for X-Deep/32 Root Window and each X client window (in multiple window mode) also support printing the entire X window or a portion of the window to the local printer.
- The X-Deep/32 supports depths of 4, 8, 16, 24, and 32 depending on the depth and resolution setting of the video adapter. The depth and resolution is controlled by control panel utility in the Windows environment.
- X-Deep/32 X-Server also implements local transport via shared memory. This enables running local X clients, compiled with X-Deep/32 Xlibs to connect to the X-Server, even if the TCP/IP is not installed. To use local transport the DISPLAY environment variable should be set as :n.0., where n is the display number, usually 0. All the basic X clients supplied with X-Deep/32 clients fileset, is compiled with this feature enabled.
- Emulates a middle mouse button on 2 button mouse. The middle button mouse event is generated when pressing the right and left buttons simultaneously and holding for given period. The time delay is configurable. See Input property tab in X-Server options.
- It supports virtual size for root window in Single Window Mode.
X-Deep/32 supports various options to personalize your X-Server settings to suit your needs. The latest release has improved user interface to configure the X-Server. The X-Server options property sheets are invoked via the Edit->X-Server Options menu from either the main window . Look foricon in the system tray, click and select Edit -> X-Server Options. The options property sheets can also be invoked from X-Deep/32 root window by selecting X-Server Menu -> X-Server Options. In multiple window mode, each X Client window also provides the X-Server Menu -> X-Server Options menu items. The various options and properties are described below:
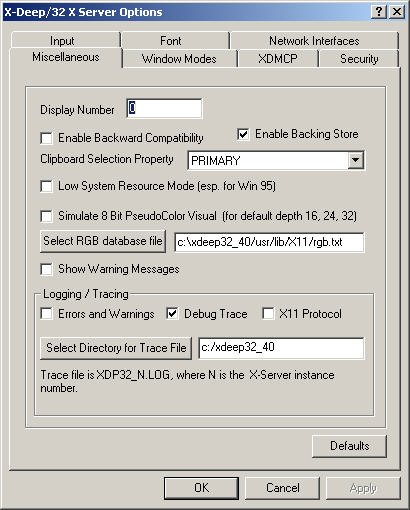
Miscellaneous Property Tab
| Property/Option | Equivalent command line arguments if available | Description |
| Display Number | :<displaynumber> | This is an integer number that gets added to the standard X-Server listening port 6000. Specifying a number <n> will make the X-Server listen at 6000+<n>. This also means that the DISPLAY environment for the clients should be set to <IP address>:<n>. The default is 0. |
| Enable Backward Compatibility. | bc | Checking this box turns on backward compatibility with previous releases of X11 (R2 and R3) required by certain applications. This is disabled by default. |
| Enable Backing Store | -bs |
<-bs disables the backing store from command line. It is enabled by default. The dialog check box turns on or off backing store feature in the X-Server. Turning on increases X-Server performance but at the cost of increased memory usage. |
| Clipboard Selection Property | Not available. | This option indicates the selection property to use for cut and paste of text between X11 and MS Window applications. If you are using CDE desktop, you might want to select CLIPBOARD. Xterm uses PRIMARY. |
| Low System Resource Mode | Not available. | Checking this will enable the X-Server to make better use of limited system resources. This might affect the performance. This is especially useful if you are running on Windows 95/98 where there are limited GDI resources. |
| Simulare 8 Bit Pseudo Color Visual | -simulate8BitPseudoColor | This option tells the X-Server to simulate 8 bit pseudo color visual when the Windows depth is greater than 8 bit (for 16,24 and 32 bits). This is useful for running certain X applications which was specifically written for 8 bit pseudo color visuals. |
| Select RGB database file | -co filename | This specifies the rgb color specification file for X-Server |
| Show Warning Messages | Not available | Turning this checkbox will enable showing warning messages. You should turn this on only when you are trouble shooting a problem. |
| Log Errors and Warning | -trace | Turning this checkbox will enable logging errors and warnings in trace file. |
| Log Debug Trace | -debugtrace | Turning this checkbox will enable additiona debug traces that might be helpful in reporting the problem to Pexus LLC.. |
| X11 Protocol | -debugx11 | This option can be used to output X11 protocol diagnostic output in xmon/xscope like format. This is useful to report and diagnose problems. Use the X-Deep/32 WIndow -> File -> Start/Stop Log Trace option to enable and disable logging at any given time to capture only the desired output. Don't check this box unless and until required to diagnose problems, other wise it can seriously impact performance and fill up disk space. |
| Trace file directory | Not available | This specifis the directory for trace file. The trace file is named XDP32_n.LOG, where n indicates the instance of the X-Server. This file may give additional information for reporting problems to Pexus LLC. |
| Defaults | Not available | This button will re-store the default values for all the options. |
Window Mode Property Tab
| Property/Option | Equivalent command line arguments if available | Description |
| Single Window Mode | single_window | This is the default window mode for X-Deep/32 X-Server. In this mode, all X clients are created within one single window. You can however start multiple instances of X-Server. This window becomes the root window in X Window terminology. The default size of the root window is the maximum allowable size for a window. This size depends on your chosen resolution in the Windows display setting. You can however specify a virtual size for this window using the next two options. |
| Virtual Screen Width | -width | This option specifies the width of the root window in single window mode. A value of -1 indicates default, which is the maximum allowable size as per your Windows display setting. If you specify a value greater than the maximum allowable value, horizontal scroll bar is added to your root window. |
| Virtual Screen Height | -height | This option specifies the height of the root window in the single window mode. A value of -1 indicates default, which is the maximum allowable height as per your Windows display setting. If you specify a value greater than the maximum allowable value, vertical scroll bar is added to your root window |
| Suppress X-Deep/32 splash window on startup | -nologowin | Checking this check box will suppress the display of logo window. |
| Multiple MS Window Mode | multiple_window | This option starts X-Deep/32 X-Server in multiple MS window mode. In this mode each X Client window is created as a top level MS window. You have an option to draw the root window in this mode. This mode uses a built in window manager. Starting another window manager will fail. This window mode is not recommended if you are using XDMCP to connect to your remote hosts, since all XDM sessions starts a remote window manager. |
| Multiple Window, X Window Mgr mode | multiple_window_rmwm | This mode allows running a remote X window manager in multiple MS window
mode. e.g You can rum mwm or twm instead of the local X-Deep/32 built in window manager. In this window mode, the drawing of root window is disabled. |
| Display root window | drw | This option enables drawing root window in multiple MS window mode |
| Defaults | Not available | This button will re-store the default values for all the options. |
XDMCP Property Tab

| Property/Option | Equivalent command line arguments if available | Description |
| X-Deep/32 Local XDM chooser | Not available | This check when checked, enables X-Deep/32 X-Server to scan for XDM enabled hosts on startup. If the X-Server finds XDM enabled hosts that are willing to accept connection it will display the hosts in a list box, where you can choose a host to connect to. This option is enabled by default. By default it will try to search hosts for a maximum time of 5 seconds. This is configurable. It also looks for all hosts in the network using XDM broadcast feature. You can limit the search by providing a list of hosts and disabling the broadcast feature. Please see Configure Local XDM option below. Checking this option will disable the standard XDM options settable below. |
| Configure Local XDM Chooser | Not available | 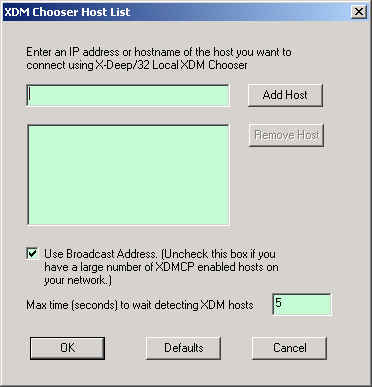 This option brings up a dialog box shown above. You can add a list of host that you want to search. By default X-Deep/32 X-Server will scan the network for a given time using the XDM broadcast packets. If you have a large number of hosts in the network, you might want to disable the broadcast feature and limit the searches to a list of hosts. You can also configure a max wait time that the X-Server waits detecting hosts on the network. In order for X-Deep/32 X-Server to find hosts, the remote hosts need to have XDM enabled. Please ask your remot host administrator to set up XDM. |
| XDMCP query by host | -query<hostname> | This option enables XDMCP. It sends xdmcp query packets to the host specified in the edit box named XDMCP Hostname |
| XDMCP by Indirect host | -indirect<hostname> | This option enables XDMCP. It sends indirect xdmcp query packets to the specified host This option allows an XDM chooser to be displayed from that host if one is available. |
| XDMCP by broadcast | -broadcast | This option tells X-Server to broadcast for XDMCP. It broadcasts xdmcp query packets to the network. The first xdmcp display manager that responds to the broadcast is chosen for the xdmcp session. |
| One XDM session only | -once | It tells X-Server to terminate after one XDM session. |
| XDMCP Udp port | -port<port-num> | This sets an alternate port number for XDMCP packets. Default is 177. |
| Display Class | -class<display class> | XDMCP has an additional display qualifier used in resource lookup for display-specific options. This option is set to X-Deep/32 X-Server. |
| Defaults | Not available | This button will re-store the default values for all the options. |
Security Property Tab
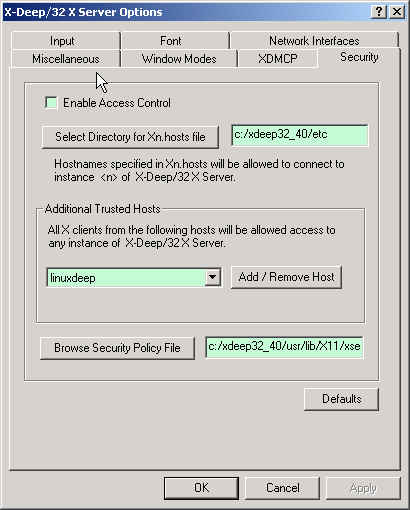
| Property/Option | Equivalent command line arguments if available | Description |
| Enable Access Control | ac | This option tells X-Server to enable access control. This will restrict
the connection from remote hosts. This is disabled by default. (Please
note in prior releases of X-Deep/32 this option was enabled by default). If this option is unchecked (disabled),
any host can connect to the X-Server. If the option is enabled, you will have to add hosts that you would like to provided access to. This can be done in one of the following ways : 1. Add host to an X<n>.hosts file. where <n> determines the instance of the X-Server. You can specify the directory for your this hosts file using the next option. The format of the hosts file looks something like this : #----------------------------------------------------- # Format of Xn.hosts file # Comments can appear like this localhostname remotehostname1 # You can also specify IP address of remote # hosts remoteIPAddress2 remotehostname3 #------------------------------------------------------ 2. After starting X-Server, running the xhosts.exe program supplied with the following parameters will allow access to any hosts or a specific host xhost + xhost +<remote host name> xhost +<remote host IP address> 3. Add additonal trusted hosts to any instance of the X-Server by clicking the Add / Remove button in the above property sheet. |
| Select directory for Xn.hosts file | Not available | This option specifies the directory for the Xn.hosts file. |
| Add / Remove Host | Not available | Pressing this button will bring up the following dialog box, that will
enable you to add additional host names or IP address that will be added
into the trusted host list for all instances of X-Server.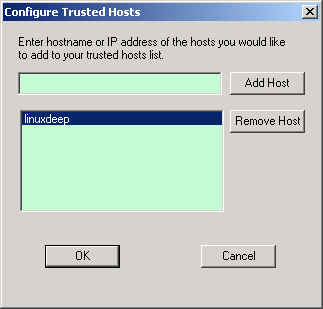 |
| Browse Security Policy file | -sp<security policy file> | This option specifies the location of the X Server security policy file. |
| Defaults | Not available | This button will re-store the default values for all the options. |
Input Property Tab
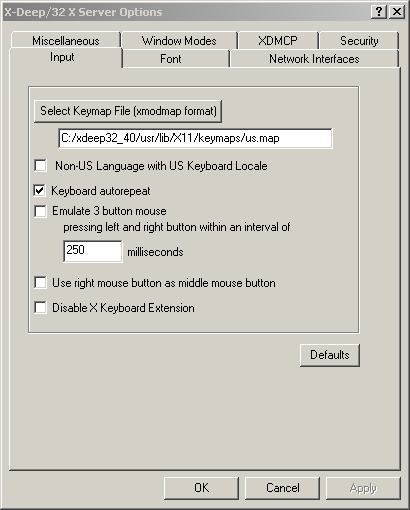
| Property/Option | Equivalent command line arguments if available | Description |
| Select keymap file | -keymap <keymap file> |
This specifies file in xmodmap format. This is used to initialize the keyboard
map and pointer map on X-Server startup. |
| Non-US Language with US Keboard Locale | -nonUSLangUSKbd | Select this checkbox if your are using non-us language with an us keyboard locale. This checkbox will make sure Alt-Gr key behaves correctly for non-us languages. |
| Keyboard autorepeat | r -enables -r -disables |
This option enables auto repeat for keyboard |
| Emulate 3 button mouse | -emuMidButton | This option emulates the middle button on a 2 button mouse (or on a mouse with a wheel button that is currently set by Windows to non-middle button function), when left and right button are pressed for atleast 250 milliseconds (by default). This time interval can be changed using the next input field. |
| Time interval for 3 button mouse emulation | -emuMidButtonDelay | This option specifies the delay or time interval for which the left and right button must be kept pressed to generated a middle button event, when emulate 3 button mouse option is selected. |
| Use right mouse button as middle mouse button | -rightForMiddleButton | Switches the right mouse button for middle mouse button and vice versa. |
| Defaults | Not available | This button will re-store the default values for all the options. |
Font Property Tab
| Property/Option | Equivalent command line arguments if available | Description |
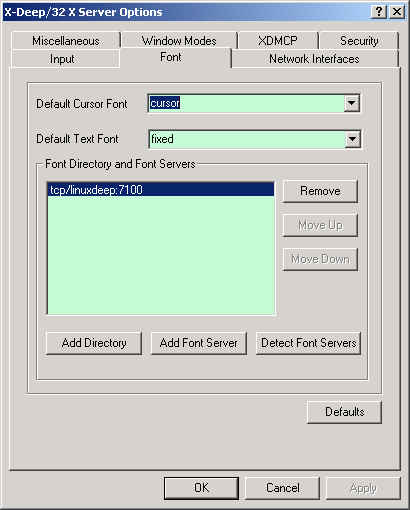
| Default Cursor Font | -fc<cursor font> | This specifies the default cursor font file |
| Default Text Font | -fn<default font> | This specifies the default text font file. |
| Add Directory | -fp<default font path> | The command line option will override the default font path for the X-Server. A graphical user interface is provided to enable easy addition, deletion and re-arranging of the default font path for the X-Server. Add Directory option will start a directory browser that can be used to add a font directory. You can add the directory path to this list if you have custom fonts in PCF format in some other directory. (Note : bdftopcf utility is provided to compile bdf font files into pcf font files) Also make sure you run the mkfontdir.exe utility to create a fonts.dir file that describes the font directory when you add custom directory. |
| Add Font Server | Not available | This button will pop up the following dialog box, that will enable you
to specify a font server manually. The specified font server will be added
to the current default font path for the X-Server.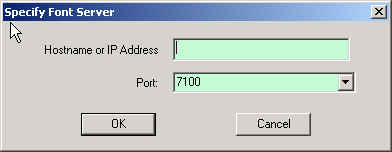 e.g, if you specify the hostname as remhost and use port 7100, and entry tcp/remhost:7100 will be added to the list of default font paths. |
| Detect Font Server | Not available | This is option will search the network for font server. X-Deep/32 X-Server will scan the network for XDM enabled hosts, and then for each
host found, it will detect if a font server is running. Pressing this button will pop up a dialog box where you can input the port to search the font server at : 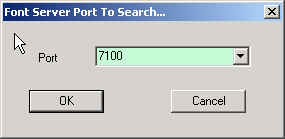 Pressing OK, will result in a progress bar that will first scan for hosts, and for each hosts found, will check if a font server is running at the specified port. After the search the following list box will be shown with the detected font servers.  You can either select all font servers found or selected ones. It is recommended you add the font server from the host that has the best network connectivity from your X-Server for best performance. |
| Remove, Move Up, Move Down | Not available | These buttons lets you manage your default font paths. |
| Defaults | Not available | This button will re-store the default values for all the options. |
Network Interface Property Tab
| Property/Option | Equivalent command line arguments if available | Description |
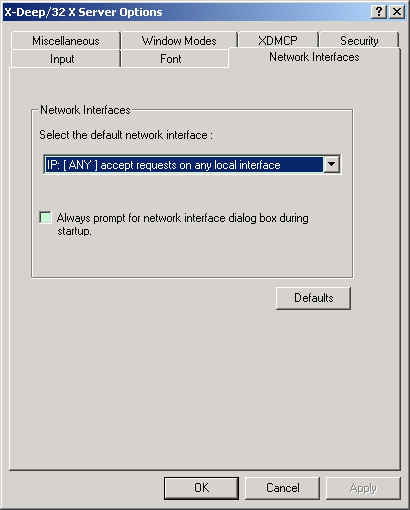
| Select the default network interface | Not available | This option enables you to select an interface for X-Deep/32 X-Server to bind to. By default it is recommended select the IP:[ANY] option. This will allow X-Server to accept connection from any interface. If you want to limit the X-Server to listen to a specfic network interface for security reasons, select the desired network interface. |
| Always prompt check box | Not available | This checkbox when checked will always bring up the network interface selection
dialog box on X-Server startup. By default, the network selection interface dialog box is only shown, when the network interface list changes. |
| Defaults | Not available | This button will re-store the default values for all the options. |
ADDITIONAL COMMAND LINE ARGUMENTS
X-Deep/32 X-Server accepts the following additional command line options.
- -defaults - This option gives default values to all the options of the X-Server. This is useful when a saved option does not enable you to start the X-Server successfully. After starting the X-Server in the default mode you can modify the option(s) that causes the X-Server to fail. The icon X-Server With Default Optionsis setup to start the X-Server using this option.
- -cookie xdm-auth-bits - When testing XDM-AUTHENTICATION-1, a private key is shared between the server and the manager. This option sets the value of that private data (not that it is very private, being on the command line!).
- -displayID display-id - Yet another XDMCP specific value, this one allows the display manager to identify each display so that it can locate the shared key.
File, Edit and Help menu options are provided in the main X-Deep/32 X-Server window. Most of this menu items are also provided on the X-Server root window and individual X Client window in multiple MS window mode. The following table describes each.
| Menu (X Client Window : is applicable in multiple MS window mode only) |
Description |
| X-Deep/32 Window: File->Print |
This option is enabled in multiple MS window mode, when drawing root window is enabled. It enables printing the entire screen or a selected area . |
| X Client Window (multiple MS window): X Root Window (single Window): Sys Menu -> Print Window |
This option allows you to print the X Client/Root Window on a local printer. You can either select the entire window with or without border, or select a specific area to be printed |
| X-Deep/32 Window: File->Print->Desktop |
This option prints the entire desktop. This is only enabled in multiple MS window mode, when draw root window is enabled. |
| X-Deep/32 Window: File->Print->Select Area |
This option lets you select a specific area to be printed. Selecting this menu starts a selection process. The X-Server cursor is changed to a cross-hair cursor. Move the cursor to the top left corner of the box to be selected. Press the left mouse button and drag the rubber band lines and release the mouse button at the bottom right side of the box that you select. This is only enabled in multiple MS window mode, when draw root window is enabled. |
| X Client Window: X Root Window: Sys Menu ->Print Window->With Border |
Prints the entire window with border. |
| X Client Window: X Root Window: Sys Menu->Print Window->Without Border |
Prints the entire window without border |
| X Client Window: X Root Window: Sys Menu->Print Window->Select Area |
Prints a selected area. Selecting this option starts a selection where the cursor changes to cross hair cursor. Move the cursor is changed to a cross-hair cursor. Move the cursor to the top left corner of the box to be selected. Press the left mouse button and drag the rubber band lines and release the mouse button at the bottom right side of the box that you select. |
| X-Deep/32 Window: File->Start X Client Launcher X Client Window: X Root Window: Sys Menu->X Server Menu -> Start X Client Launcher |
Starts X Client Launcher program that can be used to start local or remote X Clients. |
| X-Deep/32 Window : File->Shortcut to Telnet X Client Window: X Root Window: Sys Menu->X Server Menu -> Shortcut to Telnet |
This option starts telnet application. It expects telnet.exe to be in the
path. telnet.exe is installed when you install Microsoft TCP/IP services. This option provides easy access to telnet application which can be used to start remote X Client applications. |
| X-Deep/32 Window : File->Xrefresh X Client Window: X Root Window: Sys Menu->X Server Menu -> Xrefresh |
This runs the xrefresh X Client program locally to refresh your X-Server screen. |
| X-Deep/32 Window : File->X-Server restart X Client Window: X Root Window: Sys Menu->X Server Menu -> X-Server restart |
This is used to restart the X-Server. This option will create a new X-Server process and the current X-Server process will exit. |
| X-Deep/32 Window : File->Priority |
This menu allows you to dynamically change the priority of the X-Server
process. This menu has the following three options you can select. High Priority : The server runs with the highest priority. This is especially useful when you are just running the X-Server on your system and want maximum performance from your X-Server. It affects the performance of other applications on your system. Normal Priority : This is the default. Selecting this makes X-Server run with normal priority. This is useful if you are running other applications also on your system simultaneously with X-Server. Idle Priority:Selecting this makes X-Server run with the least priority. This is useful if you use the X-Server occasionally. |
| X-Deep/32 Window : File->Exit |
This terminates the X-Server |
| X-Deep/32 Window : Edit->Copy to Clipboard |
This menu option is only enabled in multiple MS window mode. This option is only enabled when you select the root window to be drawn. This option enables you to cut graphics bitmap data from the desktop to the clipboard. You can select either the entire desktop or a selected area to be transferred to clipboard. The following options are provided. Desktop : Entire desktop is copied into the clipboard Select Area : This starts the selection process. The selection process is similar to the one described above for Print. |
| X-Deep/32 Window : Edit->X-Server Options X Client Window: X Root Window: Sys Menu->X Server Menu -> Xrefresh |
This menu item will bring up the X-Server options property dialog box, which enables you to control various settings of X-Deep/32 X-Server. Please see section X-SERVER OPTIONS above for more details regarding the various property sheets and options provided. |
| X-Deep/32 Window : Help->Help X Client Window: X Root Window: Sys Menu->X Server Menu -> Help |
This option will open this html file in the default browser. |
| X-Deep/32 Window : Help->About X Client Window: X Root Window: Sys Menu->X Server Menu -> About |
Shows the current version information about X-Deep/32X-Server. |
| X-Deep/32 Window : File->Start / Stop Log Trace |
This option has been added since X-Deep/32 Version 4.6. This starts and stop logging controlled by the Logging / Traccing flags in the X-Server Options -> Miscellaneous tab section. This is useful to reduce the log file size, and to narrow down the problem diagnostic output to the desired time. |
| X-Deep/32 Window : File->Dump Diagnostic Data |
This option can be used to dump certain diagnostic data, that can be sent along with problem report. |
The X-Deep/32 X-Server supports client connections via the following transport types: TCPIP, and Local shared memory transport using the Inter process communication features of Win32(R) API. To use the local shared memory transport set the DISPLAY to :n.0., where n is the display number, usually 0.
Please see license information for copyright notices.